How To Repair Storm Damaged Shingles
If shingles are blown off during a storm, they allow water and other elements to penetrate the roof structure. Repairing these shingles prevents leaks and damage to your home.
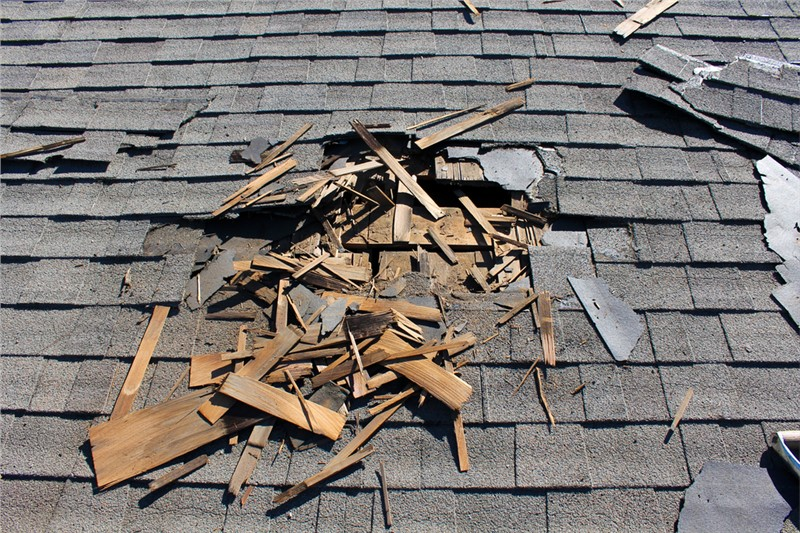
Visual clues will normally be the first indication that a shingle needs to be replaced. Carefully climb up on the roof and inspect for obvious shingle damage.
Remove the Damaged Shingles
One of the first steps in repairing storm damaged shingles is to remove any that are loose. This is a job that requires a ladder, so be careful and secure it before climbing up onto the roof. Once you have access, locate the area where the shingle has been damaged. If the shingle is curled or cracked, you may be able to prevent further damage by applying sealant beneath it. If the shingle is completely missing, it will have to be replaced with a new one.
Loose shingles aren't just an eye sore, but they also provide water entry points. That's why it's important to repair them immediately, if at all possible. If there is a lot of damage to the roof, however, it might be safer to call in roof damage Owasso professional roofing contractors.
To begin the process of removing loose shingles, locate the damaged section and carefully pry up the surrounding ones with a flat pry bar or crowbar. This will break the adhesive seal and expose the nails underneath, allowing you to pull up the damaged shingle.
The shingles are typically fastened with two rows of nails, and the first row is usually located directly above the damaged shingle. To remove the shingle, slide the pry bar under it and lift slowly. Then, after a bit of resistance, you can yank the nails out.
As you remove each shingle, be sure to save the granules that are found at the bottom of the tabs, since these are an excellent waterproofing agent. You can use these on your next shingle project to help keep it watertight.
Once you've removed the damaged shingle, place the replacement in its place and nail it securely to the roof with new nails. Be sure to use waterproof roofing nails, as they will resist corrosion from the elements better than ordinary metal nails. You can apply a small dab of roof cement under each corner of the new shingle to further protect it from rain and snow. You should also put a small amount of cement under each edge of the adjacent shingles to help keep them from sliding off the roof as you walk across the surface.
Apply Adhesive
A blown-off shingle is not just an eyesore; it can also allow water to seep under the shingles and into the house. To prevent this, you should fix the shingle as soon as you notice it.
For this, you will need a hammer, a flat pry bar and a utility knife, as well as a bag of replacement shingles that are identical in size to the ones that were damaged. You will also need a ladder, roofing nails and asphalt roofing cement or adhesive.
You might be able to salvage a damaged shingle by reattaching it to its neighbor using the roofing cement or adhesive. This can be done by putting a small dab of the adhesive underneath the edge of the damaged shingle and then pressing the neighboring shingle down into it firmly. If the shingles were already installed, then you should apply the same method to all of the other shingle tabs that have come loose.
Blown-off shingles are often caused by improper installation, such as nailing them too high or across the shingle's adhesive strip. A professional roofer should be able to inspect the shingles and provide you with proper installation advice. Click Here to schedule a free estimate with your Local Owasso Roofing Professional.
If the shingle is simply cracked, you do not need to replace it. Instead, you can apply a thick bead of sealant beneath the cracked area and press it down flat. Then, you can weigh it down with a brick for 24 hours to give the sealant time to set.
You can also camouflage the repair by collecting some of the granules from the rain gutter that have fallen off the shingle and sprinkling them over the wet sealant to cover up the crack.
You may be able to get a homeowner's or roof insurance claim for your blown-off shingles, but this will depend on the extent of the damage and the location of the affected shingles. It is important to document all the damage to your roof with photographs and video clips so that you can support any claims you might make. This will help you avoid paying for repairs out of pocket and will protect your home from water damage.
Place the New Shingles
You’re probably noticing the damage to your home’s shingles after a storm or strong winds. If you have a large number of shingles that are blow off, then you need to take steps to repair them as soon as possible to prevent further damage.
Replacing missing or badly damaged shingles is important because the gap left behind can be an easy target for the wind to blow away more shingles. It can also compromise the integrity of the roof and lead to water leaks and rot in the attic.
Roof shingles are usually held in place by nails, staples, or adhesive strips. Most experts recommend nails for their durability and resistance to corrosion. Nails should be placed at a slight angle and secured with roofing cement or adhesive. Staples, although often more affordable and quicker to install than nails, tend to have a shorter lifespan and are less resilient against the elements.
A common mistake homeowners make when replacing a shingle is to nail it directly onto the shingle above. This causes penetration to the underlayment and can reduce the shingle’s longevity as well as void any warranty that may be on it. Ideally, the shingle should be nailed to the shingle below, which allows for an overlap of the material as well as proper ventilation.
First, locate the damaged shingle and loosen any nails holding it in place with the pry bar. You will likely need to loosen the shingles on either side of the damaged one as well. Once you have access to the nails underneath the targeted shingle, slide the flat pry bar carefully under the edge of the target shingle. It’s best to do this in cool weather, as the sealant bond will be more easily sheared by the flat pry bar.
Once the target shingle is loose, remove any adjacent nails and scrape off any excess sealant with the flat end of the pry bar. Then, apply a thick bead of roof cement to the underside of the target shingle and press it into place. Afterward, re-nail the overlying shingle where necessary.
Clean Up
While structural and electrical damage should be repaired by a licensed professional, there are some minor repairs you can tackle yourself. One of the most common is repairing shingles that have been blown off during storms. Taking care of this damage right away will keep your home protected and prevent further problems in the future.
Blown-off shingles can expose your home to water and moisture damage that may require expensive repair work in the future. If left unattended, these issues could lead to mildew and mold growth, wood rot, and other costly property damage. The best way to protect your home from these types of issues is by addressing any damage caused by storms immediately.
The first thing you need to do is determine how extensive the damage is. If the shingle is missing completely, you will need to replace it with a new shingle. If the shingle is simply cracked or torn, you can probably repair it with some roofing cement. Start by applying a thick bead of the cement to the crack or tear. Smooth it out with a putty knife to create a seal.
Roof shingles are typically held in place by nails, staples, or adhesive strips. Most experts will err on the side of caution and recommend nails for a long-lasting, durable solution. Nails also work well in harsh weather conditions, where staples or adhesive strips might fail.
If you are unsure about the extent of your storm damage, it is wise to consult with a licensed roofer to make sure that you don’t have any serious structural issues that need to be addressed. A skilled roofer can also help you decide if filing an insurance claim is the best option for your situation.
If a shingle is only partially blown off, it is important to get it replaced as soon as possible. This will protect your home from further weather damage and allow you to save money by filing an insurance claim.
In some cases, you might be able to use tar to repair a damaged shingle instead of replacing it entirely. However, this is not a good idea for many reasons. For starters, tar is not an effective barrier against water damage, and it will eventually seep through the roof and into your home. Additionally, repairing damaged shingles with tar is a short-term solution that won’t last nearly as long as replacing them. Visit https://www.owassoroofer.com/roof-repair-in-owasso/ to get in touch with your local Owasso Roofing Expert!
If shingles are blown off during a storm, they allow water and other elements to penetrate the roof structure. Repairing these shingles prevents leaks and damage to your home. Visual clues will normally be the first indication that a shingle needs to be replaced. Carefully climb up on the roof and inspect for obvious shingle…